NEW Pictures, Chef Dennis's Cargo Max

chefdennis

Veteran Expediter
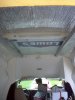
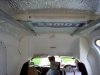
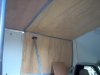
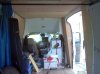
Ok, i spend the weekend working inside the can...the roof has a transpart panel that runs the length of the roof. When sitting in the heat of the heat, it gets like a greenhouse inside..the 8000 btu unit helps, but at times it just can't keep up...
If you look at the earlier pictures you can see the translucent roof panel...

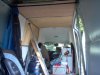
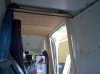
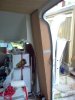
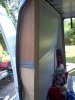
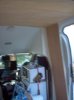
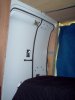
So it was time to insulate and cover the ceiling...Here are the pictures to show how that was done...I glued reflextic foil bubble insulation to the ceiling...coverd that with 1 inch form insulation board. I then ran to 7 ft lengths of "hat channel" from the bulkhead opening at the back of the ft seat 7ft back and then attached 1/4 inch luan plywood. I also did some other "wood" work to "straighen out the compound curves in the box to make it easier to finish the ft area., Net weekend i'll cover all of this area, walls and ceiling with a indoor outdoor carpet to finish off the area totally.

Once the walls are finished i'll install the TV and the Max Vent in the roof...The vent was suppose to go in this weekend but, I ordered it a month or so ago...it came and I just let it sit in the shed, didn't bother to open it, (I know what it is and what it looks like) so when i open it the other day, it was broken....so it gets sent back in the morning and i'll install the replacement in the next few weeks..

So here are a few more pictures, in the ongoing build of the Cargo Max...
 

Attachments

  • IM000337.jpg
    IM000337.jpg
    91.1 KB · Views: 209
  • IM000338.jpg
    IM000338.jpg
    89.9 KB · Views: 172
  • IM000339.jpg
    IM000339.jpg
    87.1 KB · Views: 172
  • IM000340.jpg
    IM000340.jpg
    84.4 KB · Views: 154
  • IM000341.jpg
    IM000341.jpg
    87.6 KB · Views: 161
  • IM000345.jpg
    IM000345.jpg
    86.5 KB · Views: 134
  • IM000344.jpg
    IM000344.jpg
    85.8 KB · Views: 150
  • IM000343.jpg
    IM000343.jpg
    90.5 KB · Views: 152
  • IM000342.jpg
    IM000342.jpg
    83.4 KB · Views: 160
  • IM000346.jpg
    IM000346.jpg
    85.6 KB · Views: 166
  • IM000347.jpg
    IM000347.jpg
    95.3 KB · Views: 169
Last edited:

Dakota

Veteran Expediter
Very cool but I'd ditch the indoor outdoor carpet idea and go for some orange shag carpeting ;oP

Posted with my Droid EO Forum App
 

purgoose10

Veteran Expediter
Happy 4th Dennis. Doesn't seem like you ever get done working on these things no matter what size they are. Anyway looks good and if nothing happens will see you and the rig in a couple of weeks.
When you close the curtain in the back is that to help keep the cold air and heat in?
 

chefdennis

Veteran Expediter
I was thinking the "orange shag" and some where in the basement I know i had a bunch of those long strands of "beads" that we use to hang on the doorways also...was thinking them insteand of the "freight blanket" that is up there for now!!!

Yea purgoose the freight blanket is up there for that reason...before the winter hits, the girl that runs the sail shop will have the 'snap in' barrier that is being made of 2 sheets of dycron (i think thats it) with reflexic foil backed bubble insulation sewn between them done and installed...

And yes, one of the reasons for the push to get this done in the net 2 weekend is because we will be at the Load 1 booth at the Expo, so yea Purgoose, looking forward to seeing you...
 

purgoose10

Veteran Expediter
I was thinking the "orange shag" and some where in the basement I know i had a bunch of those long strands of "beads" that we use to hang on the doorways also...was thinking them insteand of the "freight blanket" that is up there for now!!!

Yea purgoose the freight blanket is up there for that reason...before the winter hits, the girl that runs the sail shop will have the 'snap in' barrier that is being made of 2 sheets of dycron (i think thats it) with reflexic foil backed bubble insulation sewn between them done and installed...

And yes, one of the reasons for the push to get this done in the net 2 weekend is because we will be at the Load 1 booth at the Expo, so yea Purgoose, looking forward to seeing you...

Snap in barrier sounds cool. That might get her some more business. Can't wait to see that. That would work good for the guy's in Sprinters as well.
 

Slacktide

Seasoned Expediter
AHHHHHHH the wonderous powers of duct tape. Nice work thus far. I don't know if you are a smoker but if you are I would serriously rethink the carpet. The padded vinyl that is used in standard and custom sleepers is MUCH easier to clean smoker or not. Most folks I know that are out here are pulling any carpet out of their trucks. Alergies having been one of the other reasons aside from the cleaning issues carpet poses. Just a thought, again it looks good.
 

chefdennis

Veteran Expediter
Nope, not a smoker and carpet hasbeen in my GMC CV for going on 4 yrs now....carpet it will be....Cleaning!?!? Ahhh...no...:D

Well the "Area" rug or section of of bound carpet that s on the floor gets vacuumed and will need replace at the end of the yr, but, no cleaning...:)
 

guido4475

Not a Member
I desperately need to get mine insulated, walls and ceiling.Got the Powervents at The rv surplus store in Elkhart, they were only 59.00 each, 2 windows, screens, tinted,double pane, 12.00 each. I have to be able to let this van air out when I am going down the road with stinky freight on board..The last load about killed me..alot to do, so little time...
 

Rocketman

Veteran Expediter
Looks good Dennis. That gives me some ideas on how to work with mine. I'll just do the ceiling in mine though. The factory side panels are good enough for a poor boy :). I'll probably do some shopping this week to see what all is available to work with. I want to have my insulation sprayed in, but I've got a feeling it's gonna be hard to find a contractor around here. I may have to do it myself...but that requires physical labor? (bad, bad, very bad, it's hot out.... there ---> ) :)

I like the beads. Maybe some shag carpet and a disco ball? woohoo we havin fun now :)
 

Dakota

Veteran Expediter
Looks good Dennis. That gives me some ideas on how to work with mine. I'll just do the ceiling in mine though. The factory side panels are good enough for a poor boy :). I'll probably do some shopping this week to see what all is available to work with. I want to have my insulation sprayed in, but I've got a feeling it's gonna be hard to find a contractor around here. I may have to do it myself...but that requires physical labor? (bad, bad, very bad, it's hot out.... there ---> ) :)

I like the beads. Maybe some shag carpet and a disco ball? woohoo we havin fun now

Don't forget the CB and HiFi 8 track player, and a lava lamp would be perfect in the back:rolleyes::D
 

xmudman

Veteran Expediter
Owner/Operator
Once you get Miss Mudflap inside... :D
 

Attachments

  • 2004011880_Display-35.gif
    2004011880_Display-35.gif
    4.1 KB · Views: 17
Last edited:

xmudman

Veteran Expediter
Owner/Operator
How would these look on a Dodge Sprinter? It would be cool to see who gets the joke :D
 

Attachments

  • StreetVan.jpg
    StreetVan.jpg
    55.8 KB · Views: 31

chefdennis

Veteran Expediter
Thanks Oiler...Rocket, you are right the factory sidewalls are good enough, just make sure you pull them down and insulate behind them... now the reason you see that 3 ft x 2 ft sheet of plywoor on the lt wall was because i needed a longer piece to make the covering the compound curve of the body easier...if I could have just made a smaller piece work to cover thatcurved corner, I would have...if you look at the pass side in that curved area, I boxed it in with 3 inch alumimum channel then covered that in th luan plywood, but i didn't want to box both sides and lose that much space. so the use of the longer piece to get the bend of the wood right to cover the curve was needed...you can't see it too go in the pictures, but you know since you have the van at home, there are 2 curves in that part of the box to insulate and cover.....

The other use of the wood at the read of the side doors was done for convenience and to make the installation of the sail material wall/seperator easier and less expensive later this yr (it will be cheaper to make because the cuts and seams will all be straight instead of curved....

Make sure you go back and look at the other thread when I 1st started the makeover...there is some other stuff there that will help....

One thing also about the ceiling, I used "hat channel and fastened to the cross supports using the flanges on the hat channel...that leaves about a 4 inch gap between te lowered wood ceiling and the factory roof..if you want to narrow that gap, you can use 3 inch aluminum channel and then cut it to fit "around the factory roof suppourts..if yo do that, you will narrow that gap to just about 1/4 inch more then the factory roof support....I did it the way i did because i wanted the room for the foil insulation , the foam board insulation and i also wanted a "air gap" ....while that translucent roof panel creates a "greenhouse " affect and it gets hot...even with the insulation that "air gap" can transfer a little bit of heat to the wood ceiling which isn't bad at all, but does let some heat there that will be a bit of a good thing in the cold temps....
 

guido4475

Not a Member
Looks great!! Question: What brand, or kind of adhesive in a caulk tube can I use to glue the foam/foil faced insulation panels to the aluminum roof, that will not eat through the foam it self, and will stick to the aluminum roof,even as hot as it gets? I will use that foil bubble wrap to cover the whole ceiling once the foam panels are installed, and then, thin luan over that to finish it off.I need to nstall the 2 roof vents first, before any of this, however.
 

chefdennis

Veteran Expediter
Guido, the adhesive was the issue from the start..the translucent roof created soo much heat that finding something that work didn't happen...I ran around with just the foil up for about 2 weeks, it would fall off during the day has the sun heated it up and the glue released because of the heat build up..i can tell you with this roof, that foil got hot to the touch. What I finally ended up doing was using 3m hd spray adhesive to glue the foil to the roof 1st..then I put the "Hat channel up to hold the foam board against the foil...the attached the 1/4 in luan to the hat channel. I also used a few screws screwed into the factory roof supports and against the edge of the foam to keep them against the foil..you can see how i used the hat channel in both directions against the roof in 2 different pictures if you look hard...

I talked to a Sherwin Williams paint salesman and his recommendation for strictly gluing the foam was to use "contact cement" (there are several that work up to over 100*'s and you buy it by th gallon...glue both sides of the foil and foam board, let it setup then put the foil up then the foam board in place.

But yes, put the vents in 1st...that was my plan, but the vent was broken.....
 
Last edited:
Top